|
|
 |
 |
 |
 |
 |
 |
 |
 |
 |
 |
 |
 |
|
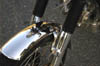
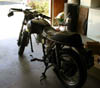
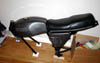
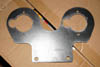
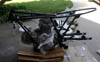
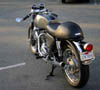
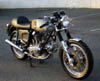
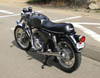
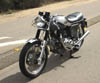
My First Bike Restoration: Ducati 750 GT (This is a reproduction of an article as it appeared in the San Diego Antique Motorcycle Club Newsletter: “The Herald”) I can’t pinpoint the exact moment when Ducati’s round case motor seduced me. But seduce me it did. And like many things with two wheels once I get an idea in my head there’s little stopping me from pursuing a courtship. Well almost nothing. After doing some research I found a bike that seemed like a reasonable machine to pursue. It was abandoned at a local shop for years. I had talked the shop owner into taking over title so he could sell it to me. As time went on and little progress had been made to transfer the title into the shop’s name I began to get antsy. As I waited, a very nice Norton Commando was put on consignment at GP Motorcycles. I tried to ignore the Commando but before my obsession for a round case Ducati began I had lusted after a Norton Commando. But then who hasn’t. Right? But there was no shaking my resolve. I was going to wait for my 750GT. After several more months passed the title situation was finally resolved. I sat down to talk about the particulars with the shop owner only to discover that I couldn’t really afford to fix up the bike the way I wanted to. Discouraged about getting a bike that wasn’t exactly what I wanted I remembered that beautiful red Commando and I set out to get some instant gratification. The 750GT was one courtship that would be delayed for a time. About two weeks before I decided to buy the Commando the owner took it off consignment and it was no longer at GP. To make matters worse GP has misplaced the Commando owner’s phone number so I couldn’t contact him to let him know I was interested! After what seemed like forever (I’m sure it was only a few days) Isaac Heinrich (of GP Motorcycle fame) remembered the number. I contacted the owner and struck a deal for the Commando. Just like that my Ducati round case dreams seem to be over (at least for now). I have thoroughly enjoyed my Commando and already had more bikes than space so I was content to live my life without a round case Duc. In the meantime, the shop had gone through the mighty Duc and got it running again. One of the shop employees was going to buy it and so it seemed the bike just wasn’t destined to be mine. Or was it? The shop employee moved out of the country and never took delivery of the bike. So it sat at the shop once again. I heard that it was going to be auctioned off on eBay so I figured it was gone; never to be seen again. Two years or so had passed when one day I walked in the back of the shop and there it was. I asked the shop owner about it and he said he was thinking about making it into a race bike. I asked him if I could buy it instead and much to my surprise he said yes! I guess I was destined to own this bike after all. Did I make space for the bike? Of course not. I was going to have to find a space for it. After so much time had passed the day finally came for me to pick up the bike. It was fairly rough cosmetically. The frame needed painting or powder coating; the aluminum needed polish; the chrome needed to be re-plated; the front fender and headlight were incorrect; the seat was torn; just the perfect canvas for restoration project! I’m not a big fan of the aesthetics that developed in the 1970s with respect to motorcycles (or cars for that matter) so the 750GT had a few styling cues that I didn’t care for. I seem to be drawn to bikes from the 1930s to the late 1960s but I’m particularly fond of bikes from the 1950s and 1960s. I once stared at a 1950-something Matchless G45 for nearly a half hour one day at the Del Mar Concourse exhibit. I just kept walking around it with my jaw dropped. Something about a late 1950s race bikes really appeals to me. I’m also a big fan of the Norton Manx or any well done café racer. I knew that I wasn’t going to restore this 750GT to look stock. I never cared much for Ducati’s paint schemes on the 750GTs nor did I care much for the 1970s styled fiberglass dash that came on the bike. After searching for ideas on how to style the bike I deiced that a café racer inspired look was what I was after. I found some pictures of the 750GT factory prototype and thought it was perfect. So perfect I wondered (and still do) why Ducati never put the bike into production. Armed with only a few black and white pictures of the prototype I set out to build something close. My first bone of contention was the gas tank. The stock tank looked too angular to me and lacked the flowing lines of the prototype tank. I hoped that Ducati had used a tank from an earlier model on the prototype but my research was proving to the contrary so I was stuck with the stock tank. My bike is a 1972 model and ‘72 models have fiberglass gas tanks. After hearing horror stories that fiberglass tanks from that era were delaminating I was getting nervous about putting a nice paint job on my tank. As I continued researching my gas tank options I was also looking into locating a suitable stainless front fender since the original fender was missing. I really wanted to stay with a stainless fender since the rear was stainless and I really like the look of stainless. Unfortunately, a stainless 750GT fender is not an easy item to locate. There seem to be many steel (not stainless) front fenders and fiberglass front fenders as well, but no stainless ones. I decided I would have to go with fiberglass which available new. My fender search also led to other fiberglass parts including a “Sport” style tank in fiberglass. If I could find a good way to seal the tank it might just work. At least a new fiberglass tank might last longer than an old that has been sitting. So my logic went. I ordered the fenders but wanted to do a bit more research on tanks. Just after my fenders arrived I remembered a friend of mine, Keith Newby, had a GT in boxes that he wanted to make into a Sport replica. If he had a stock stainless fender maybe he would make a trade for a set of fiberglass fenders (which were originally used on Sport models). I called Keith and he respectfully told me that he didn’t want to break the bike apart by selling off bits (ah, a man of principle… you’ve got to like that). Instead, he offered to sell me the whole bike! Of course you can guess what happened next. That’s right, I now find myself the proud owner of two GTs!!! I had one complete bike and one disassembled bike that I fondly call the “parts bike”. The parts bike not only had the correct front fender but it also had a steel tank (which was used on later models). The steel tanks used plastic badges, which were recessed in the tank and look more 1970s to me (remember, I’m going for a 1960’s look wherever possible). I mentioned to Keith that the recessed badges weren’t as much to my liking as the early decals so he suggested that I fill in the badge recesses (with Bondo) making it possible to use the early style decals. Great idea! Now why didn’t I think of that? Now I had a good tank to work with and delaminating was no longer a concern so off to the painter I went. Scott Garland’s friend, Jim Hansen, is an amazing painter. He painted my 1968 Triumph Bonneville tank exactly how I wanted it so I knew he was the man for the job. I was trying to pattern the tank and side panel paint scheme after the prototype 750GT but no color photos exist so I tried to figure out the color using only the black and white photos that I had. The bike seemed to be a dark shade of silver. After reviewing the black and white photos with Jim he mixed up a few shades for me to choose from. Once I settled on a shade for the tank and side panels I told Jim I wanted a black racing stripe down the center of the tank with light silver pinstripe. We selected a complimentary shade of light silver for the pinstripes. The next step was to have Jim re-create the font that was used for the “750” on the side panels since this style of lettering was never put into production. After some consideration Jim had convinced me to paint the Ducati logo and the 750 the same color as the racing stripe on the tank (black with lighter silver pinstripes). Since the Ducati decals came in white lettering with a black pinstripe (and maybe on other option) Jim was going to create stencils from my Ducati decals so we could use any colors we wanted. He sure had his work cut out for him but there was never any doubt that he wouldn’t be able to pull it off. The side panels that came with the bike had less than desirable indents where there should have been actual vent holes. Jim was able to cut out the indents and make them look like they were always vented. A little screen behind them and they look like something straight from the factory. Now Jim is a meticulous painter. He tells you exactly when your job will be done (something like 9 weeks) and then he starts the work. The reason it takes him so long is because he waits the prescribed amount of time between coats of primer, paint, etc to allow for proper off gassing. I will not have problems with this paint bubbling from the inside because this paint job was not rushed. True enough to his word he called me to the day he said he would to let me know my paint was ready. I was very excited to see the finished product. I was not disappointed. The paint couldn’t be better! It’s the perfect shade of gunmetal silver. Jim sent the pinstripe work to “his guy” and all of the light silver pinstripe was done by hand! He did an amazing job! It’s truly a marvel to look at. While the paint was being done, Scott Garland helped me to tear the bike down. We spent a few hours one Saturday tearing the bike down to nothing. The motor needed to have the top end freshened up (it’s very typical for valve guides to need replacing), the frame powder coated, the chrome bits refinished, and the aluminum and stainless polished. In April of 2005 I dropped the motor off at GP Motorcycles to have them do the critical engine work which was too daunting for a rookie like myself. Chris Wycoff’s motor had gone in just before mine for a complete rebuild so GP told me my motor wouldn’t be done right away. I had a ton of work to do before I would be ready for the motor anyway so it didn’t really matter to me. Shortly after Steve took the motor apart for inspection he told me the valve guides were bad (as expected). This was a common problem on the early bikes. The bad news was the company that makes the new (and greatly improved) valve guides had run out of stock. They were going to have to make more and I was going to have to wait. So I slowly plodded along working out all of the rest of the bike’s essential details. The next thing on my list was to figure out what type of front brake setup I was going to go with. I had some time to decide while the rims (original Borranis – mmmmmm… original Borranis) where being polished. I really like the look of a 4-leading shoe brake and I had my heart set on finding one for my bike. The normal sources didn’t have any in stock. I was also concerned about finding a compatible axle (not knowing if the stock axle would work) and a way to make a brake brace. As I researched my options I learned that I would have to have the rims re-drilled to accommodate a different spoke angle since the 4-leader has a much greater outer diameter than the stock disc brake hub. I wasn’t about to molest a virgin Borrani so I opted for a twin disc setup. I knew the twin disc option was going to be the best performance option but I really didn’t want a master cylinder mucking up my handlebars the way they do. Nothing looks better than the clean lines of my ’68 Triumph with its simple front brake lever sans master cylinder. But a man must be practical at times in his life (or does he?) and the twin disc option just made the most sense. The front brake issue was solved but that doesn’t mean I don’t still dream of building another front wheel with a 4-leading shoe brake using a new rim (drilled to the correct spoke angle already). Who knows, maybe I will someday. The next item to tackle was the seat. The stock GT seat had a very ‘70s look to it with molded pleats and a huge “DUCATI” logo stenciled on the back of the seat. Not being thrilled with that look I set out to find an attractive double seat to serve as inspiration. I’ve always been partial to BSA’s A65 seat. It just looks right. Then I realized that my 1973 Moto Guzzi Eldorado had similar styling cues so I took it to Mike the seat maker at NBI and gave my instructions for how I wanted the seat to be made. Little did I know that this would be one of the last seats Mike would ever make (but I’ll touch on this topic again later). The last little detail was the Ducati seat badge I found. It was the perfect (understated) way to finish off the seat. With the seat done, the frame back from powder coating, and the tank and side panels painted, I put the pieces together and left them in my office while I waited for the motor. It was a real treat every time I walked into my office and saw that beautiful gas tank sitting on the pristine frame. The seat was beautiful too. I could only imagine how the finished bike would look. I decided that I had to go with clip on handlebars since the prototype used them (and they look cool). Who cares if the bike is comfortable? Right? After trying several pairs of Paulo Torazzi clip ons that didn’t make the grade, Isaac at GP turned me onto a set of Tomaselli replicas. I finally had my clip ons. Now I had to deicide what to do about the gauge mounting on this bike. The gauges, headlight switch, and idiot lights were originally installed into a fiberglass dash. The gauges were the original Smiths (although Veglia gauges were used on later bikes). At some point I decided that the fiberglass dash was too 1970s for me so I opted to change things around a bit. The first order of business was to buy a Norton Commando headlight so I had a tasteful place to locate my light switch and my idiot lights. Now the hard part; make a new bracket to mount the gauges. After looking at every beautiful sporty bike I could find I settled on something between a BSA Rocket Goldstar and a Triumph Bonneville of the late 1960s. I haven’t worked with metal since the 8th grade so I wasn’t sure where to start. After consulting with Keith Newby I set out to make a full sized template out of cardboard. I measured everything up and started drawing. Once I was happy with the shape I cut out the template and mounted it on my bike. It was almost exactly what I wanted but not quite so I made a few tweaks to my measurements and made one more template. This time it was perfect! Keith had some extra steel and said I was welcome to cut off a piece. I bought a few tools (mainly a new jigsaw) and went to Keith’s house to get started. I transferred my template to the steel and started cutting away. It was pretty rough going as the jigsaw wasn’t really the best tool for the job. But I cut as close to the line as I could and ended up with a pretty good basic shape. I drilled out the holes where the gauge mounting bolts are located and then tried using my hole saws to cut out the bigger holes to accommodate the area on the bottom of the gauge where the screws and the instrument lights are located. Sadly, we made no progress with the hole saws. I thought a bi-metal hole saw would work but it didn’t so now I had to figure out another way. I called my friend Tim Johnson to see if he had any tools to grind away the rest of the material to create the final shape of the mounting bracket (cut to my lines if you will). He said he did and invited me over to get to work. He has also had experience cutting holes in metal with hole saws and he said he’d take a look at that as well. I mostly used an angle grinder to smooth out and shape the rest of the curves on my bracket. Sparks were flying and the bracket was really taking shape now. I was reminded of how much I enjoyed working with metal when I was younger. Once the shaping was done we turned our attention to drilling the large holes. Tim set up his drill press and started drilling away. Much to my surprise, he was making serious progress! How did cut a hole using the same hole saw on a drill press when I couldn’t do it only days before? Easy, he knew to slow the speed of the drill press down and to use cutting oil. Did anybody say “butter”? I took over and drilled the rest of the holes and cleaned up the machining. I took the piece to a machine shop with a brake to have it bent and then to the powder coating shop for a nice finish. Things were really starting to come together now. Mind you, there were months where I did nothing to this bike except order parts and dream of one day when it might be done. It’s now September or October and I got a call saying the pieces I sent out for polish were back. I gathered up as many nuts and bolts as I could and sent them out for cad plating. I also sourced replacements nuts and bolts in stainless steel where I could. It’s now November and I got the call from GP saying my motor was finally finished! It took forever for the new valve guides to be made but that didn’t seem important anymore. I was finally ready to assemble the bike! I started by putting simple things together (or so I thought they would be simple) like the taillight. Of course I rejected the notion of using the large and ugly stock taillight and opted to use the cute little round one found on European specification bikes. Both were made by CEV and both had identical mounting points. So it was possible to bolt either version to the taillight bracket without any modification. I found it odd that I was able to find almost every replacement part for the taillight (including the round CEV taillight itself) but I couldn’t find a replacement rubber mount that held it in place on the taillight bracket. After mentioning this problem to fellow club member and all around character Mutt himself he said he had some rubber that I could use to make my own mounting piece! So that’s what I did. I copied the original as closely as I could and the next thing I knew I had a complete rubber mounted taillight. The next step was to assemble the bike. The motor was the first thing to be mounted in the frame. Then the front and rear suspension went on. Then the wheels, etc. Before I knew it, I had a complete rolling bike! I was really looking like a bike now. Then two new problems arose. The first problem was one of my own making. I had to have a more café styled seat for this bike. My love for café racers led me to decide to make a café style seat for the bike. I had considered buying a 750 Sport seat which has a fiberglass hump on the back but aside from not wanting to have to get it painted I really wanted that more old-school look that an upholstered fiberglass café seat brings. I had heard rumors that Mike from NBI had passed away. I knew form speaking with Mike that is wife was terminally ill so I thought that people had mixed up the story and thought that Mike had died instead of his wife. I called NBI to get the real story and indeed Mike had passed away. He was only in his 50s. He had done a lot of quality work over the years and he and his contribution to San Diego motorcycling will be missed. I found myself looking for a new place to have my seat made. I had always heard wonderful things about OB Upholstery but I didn’t’ have any direct experience using them. I figured I’d try them out so I brought some books with pictures of seats I liked down to the shop and showed them what I wanted. They were an absolute joy to work with. They took a genuine interest in my project and did first rate work. The seat wasn’t cheap but boy was it worth every penny! You do get you pay for sometimes. I had a few problems getting things to mount or locate properly so I decided to have GP sort out the details that I couldn’t. It’s good to know your own limitations. After having those tidbits sorted I had to turn my attention to the next problem at hand. The fender I had bought an entire parts bike to obtain didn’t fit!!! The tire that GP had mounted before I got the bike was too fat. I had two options: put a narrower tire on; or find another way to mount the fender. It never occurred to me before this moment that I could use a Norton Manx style fender and “Y” mounting brackets. So that’s what I did. I ordered a new stainless fender and “Y” brackets from jolly old England. With that out of the way for the time being I had to move to the final technical issue; the electrical system. Mutt had offered to lend me his electrical expertise by wiring my bike for me. He used relays for a variety of things including my headlight (to make it brighter without taxing the entire system) and my horn (which is now ridiculously loud). He did an artful job that even impressed master mechanic Steve Shirk from GP. Finally, I rolled the bike back into GP Motorcycles to have Steve work his magic. Before having Mutt wire the bike, Steve had already double-checked my work (as I mentioned above) to make sure the bike was safe. In addition to the safety check he also sorted out a few problems that were beyond my skill level. I wanted him to start the bike and dial it in since I had never done final tuning on a new motor (especially not a motor of this type). The last thing I wanted to do was wash out rings or something equally devastating. A few days and dollars later I had a beautiful running machine for the ages. I’ve put around 400 miles on this bike since it’s completion and I have to say it’s a complete joy to ride. I think I have some pretty nice bikes in my collection but none have attracted the attention that this bike does nor do the others equal its performance and handling. At some point I’ll have to write something on the bike from a riding perspective. I’ll close this saga by doing something odd. Who? Me do something odd? <grin>. I know this is kind of goofy but this was my first restoration project and I had a lot of help along the way so I wanted to acknowledge the following people (in alphabetical order) who were instrumental to me in the process in one way or another (sorry if I left anyone out): Roy
Agosta - OB Upholstery Jon Saltz can be reached at [email protected] |
|||
Website created by & © FEzone.com 1998-present, All Rights Reserved.