|
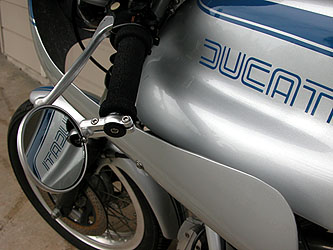
All CRG Mirrors
can be set up for either left or right hand use. The
elbow is a symmetrical part, which can be flipped over by
accessing the mount screws, which are hidden under the
mirror glass. Accordingly the glass needs to be removed in
order to access the elbow mount screws.
First determine which
model Hindsight you have: (Please note these
instructions are applicable to 2001 and later CRG Hindsight
Bar End Mirrors). Pre-2001 model Hindsight Mirrors are
identified by a three point glass retention design. The
three points are comprised of two delrin (plastic) hooks and
a third delrin washer/screw hold location. 2001 and
later model Hindsight Mirrors are identifiable by a two hold
point design. The two points are comprised of a single metal
hook (machined into the bezel) and a black fiber/stainless
washer/screw hold. If you need instructions relating to
early model Hindsight Mirrors, please....
Warning: The mirror
of the hindsight is a glass (not plastic) lens and is highly
breakable. When handling the glass, particularly with
unprotected hands, take caution to avoid using excessive
force while working on this assembly. Further, extra caution
should be exercised when using metallic tools, which could
break or shatter the mirror glass.
Tools required —
3mm Allen (Hex) key / wrench
Glass
removal/Installation — The glass of the Hindsight Mirror
is retained by a single M3 button head screw (a second
retaining point is an integral machined-in detail on the
bezel).
Step 1 Remove
mirror from bike.
Step 2 Remove the screw using a 2mm hex key. Take
care not to lose the black fiber and stainless steel
washers.
Step 3 Break the set of the gasket by rotating the
glass in the bezel with your thumbs. (The glass is pressure
set in the bezel with a buna rubber gasket.) Tip: If the
gasket is difficult to break loose, try putting a little
soapy water or glass cleaning solution on the seal, and seep
it between the edge of the glass and the gasket by pushing
the gasket away from the edge of the glass. Do not proceed
to the next step until you can rotate the glass in the
bezel.
Step 4 Pry the glass from the bezel with a pointed
tool, using great care. Insert tool at the edge near the
screw detail. A push pin type tack works well for this task.
Step 5 With the glass removed the M5 button head
elbow retaining screws can be loosened using a 3mm hex
key.
Step 6 Flip the elbow over and reinstall.
Step 7 Installation of the glass is a reversal of the
removal procedure with the following comments: Make sure the
gasket is seated into the bezel groove around the entire
perimeter. Wet the gasket with soapy water or glass cleaner
just prior to glass installation. Install the glass under
the machined “hook” first and push with thumbs while
rotating into the bezel. Reinstall fiber washer, stainless
washer and M3 button head screw.
NOTE:
If you bought replacement glass kits, elbow upgrade kits, or
simply wish to convert a left hand mirror to a right hand
mirror [or vice versa], and you are having trouble figuring
out what to do..... Send me all the pieces and I'll do
it for you for $20 per mirror + shipping back to you. |